foto")
Procesor Intel Pentium M735 2MB FSB 400 PINMOD 2.26 ghz (1.7)
-
Numar articol:43883090
-
Disponibilitate:Indisponibil
-
Preț:150,00 Lei
-
Anuntul a expirat la:11.12.2010, 09:26
-
Vinde si tu:Pune in vanzare un produs ca acesta
-
Optiuni:
Descriere
Vânzatorul este direct răspunzator pentru produsul afișat în această pagină.
Disponibilitate: Indisponibil - Vezi produse similare
Specificatii
Pin modding an Intel Pentium-M to overclock performance isn't a new thing, but with current Core 2 Duo chips driving first generation Pentium M Dothan pricing down, you can upgrade your 2-year old Pentium M notebook for only a few dollars.
Step 1: Pretend to know what you are doing
This pin modification ("pin mod") allows you to overclock a Dothan CPU to being 33% faster than its normal speed. This mod works on Pentium M 715, 725, 735, 745, 755 and 765 processors (1.5GHz, 1.6GHz, 1.7GHz, 1.8GHz, 2.0GHz, 2.1GHz respectively when not overclocked). Opening and overclocking a notebook is a risky procedure, especially if you have NO past experience, so it would be a wise choice to do it on a used old notebook -- even better if it's somebody else's, such as a friend's.
When asked by your friend how pin modding works mumble something about grounding the BSEL[0] pin, thus "tricking" the CPU Front Side Bus to run at 133MHz instead of 100MHz, since its multiplier stays the same it will overclock by 33% turning a 1.6Ghz CPU (16 X 100Mhz) into a 2.13Ghz CPU (16 X 133Mhz). If they keep asking more annoying questions to see if you know what you're doing, just tell them it's magic.
Step 2 : What you need
Whether a friend's notebook or yours, Pentium M Dothan pin modding is possible only with "SONOMA" notebooks. That is, any notebook with the Intel 915 chipset and running at 533Mhz (4 X 133MHz). The Dell Inspiron 9300 used in the making of this tutorial is an example of a notebook with the Intel Sonoma chipset. If you don't know what Pentium M processor and chipset your notebook has, check with CPU-Z to find the motherboard clock speed. Chances are that the Sonoma notebook you have on hand is already out of warranty and about to croak any second now -- well not really but it will make you feel better thinking that when you damage it during this process.

In addition, you'll need to get your hands on a Pentium-M Dothan rated at 400Mhz FSB. This mod will not work on 533Mhz Dothan processors since they are already working at 133Mhz. The required CPU must also have 2MB Cache size and can be identified by the 7x5 model number scheme. Recommended picks are the lower end 1.5Ghz and 1.6Ghz (Pentium M 715 or 725) Dothans, those can be easily found used on eBay for 30$-50$.
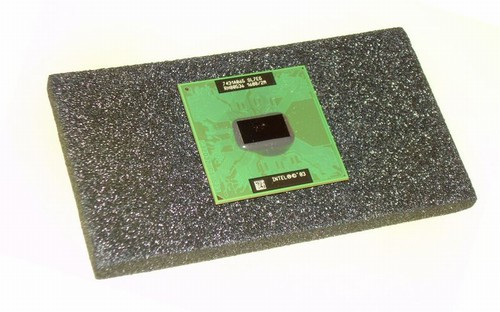
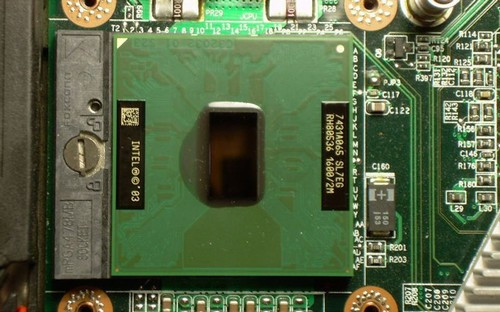
A new Intel Pentium M 725 1.6GHz Dothan processor that will
serve as the processor to be pin modded (view large image)
Below is a table of processors that can be modded and the speed that can potentially be achieved by doing a pin mod:
| Core speed | Overclocked | |
| Dothan 715 2MB 400FSB | 1.5Ghz | 2.0Ghz |
| Dothan 725 2MB 400FSB | 1.6Ghz | 2.13Ghz |
| Dothan 735 2MB 400FSB | 1.7Ghz | 2.26Ghz |
| Dothan 745 2MB 400FSB | 1.8Ghz | 2.4Ghz |
| Dothan 755 2MB 400FSB | 2.0Ghz | 2.66Ghz |
This might be a good time to remark there is no 100% success guarantee, even if you try to overclock a low end CPU, as you go up the speed scale of processors to the 2.0GHz chip the chances of sucessfully pin modding and overclocking by 33% gets slimmer. The 1.7GHz and faster CPUs are most likely to fail with or without an increase to the Vcore, making the machine very hot, unstable or both. Furthermore, you might damage the CPU and/or the notebook by modding. By following this article you are hereby take full responsibility for the consequences. Sign here -- here -- and on the dotted line here.
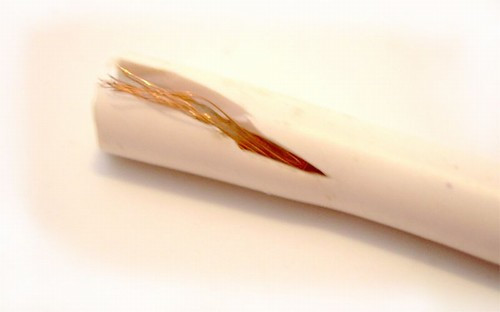
For the pin modding itself you'll use a very short and thin strand of copper wire, you can get this by cutting a piece of any TV antenna cable -- just make sure it's the neighbors cable and not yours.
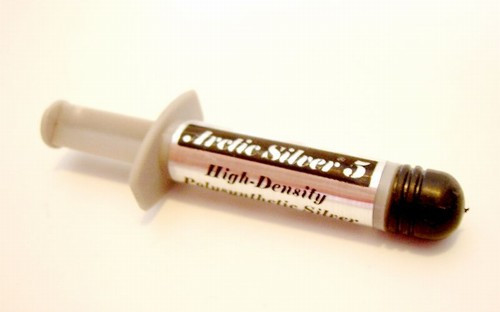
You'll also need a thermal paste such as Artic Silver 5, unfortunately you can't scrounge that out of the garbage and will have to buy it for $3 or so.
Step 3: Take out the old CPU
Some notebooks allow instant direct access to the CPU via a plate cover on the bottom. But you will have to dismantle it piece by piece until you get to the heatsink that covers the processor. Once you remove the heatsink, turn the screw to unlock the CPU from the socket. Carefully remove the CPU and put it aside with the rest of the parts in a sturdy box -- that way it will be simple to send them later along with the notebook to the nearest authorized repair center.
Step 4 : Connect the pins
Cut out from the antenna cable a strand of thin
copper wire about 0.5cm long -- throw away the rest of the 5 foot
cable you cut earlier (what a waste). Don't make this small
piece of copper too long as you only want to connect the
pins not to shorten the circuit below the socket holes. If you
think you'll have a hard time cutting such a tiny wire without
dropping it, wait until you try to form a U shape wire out of
it.
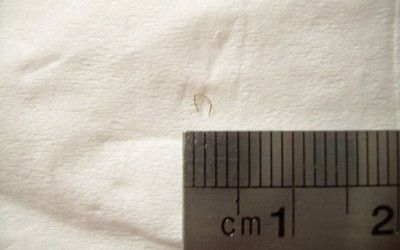
Take the U-shaped wire you prepared and use it to connect the 15th & 16th holes from the left in the 3rd row of holes. Be persistent trying to do this, you'll manage it eventually on the 4th piece of wire you've cut after dropping the first two on the carpet and accidentally inhaling the 3rd.
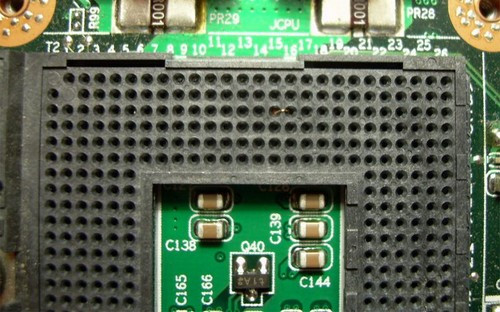
Step 5 : Replace the CPU and apply AS5
Double check the wire is in the right place and then seat the 400Mhz Dothan in the socket, and secure it in place using the Zif-lock. Carefully clean the core surface of any old thermal paste residue and fingerprints using pure isopropyl alcohol, even the thinnest oil layer will reduce the effectiveness of heat transfer from the core to the heat sink resulting in overheating of the CPU.
Processor before Arctic Silver 5 is applied (view large image)
Apply Arctic Silver 5 on the core according to the Arctic Silver 5 instructions page, some claim a thick layer is better as well as another layer on the heat sink, however Arctic Silver instructions specify otherwise, explaining you should have as little paste as possible between the CPU and heat sink. So put on only a small amount, about half the size of a rice grain, and spread it using a new clean razor blade until you have only a thin layer. Clean excess AS5 residue and bandage your finger you cut with the razor blade (try and make sure no blood gets on the processor).
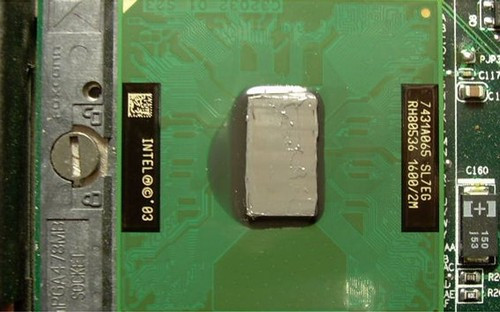
Processor after applying Artic Silver 5 (view large
image)
Using pure isopropyl alcohol to clean the heat sink itself of any old thermal paste residue before you mount it back over the CPU.
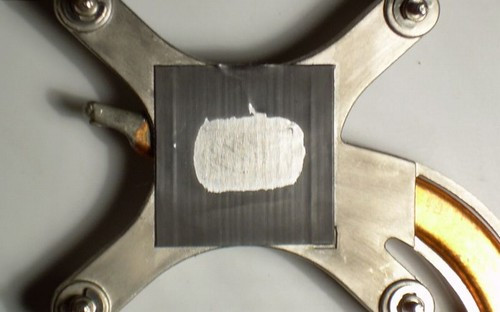
Bottom of the Heat sink -- use isopropyl alcohol to clean off
old thermal paste residue before placing back over the
processor
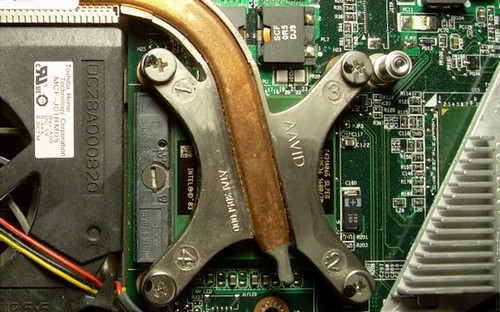
Heat Sink back in place over the pin modded processor
(view large
image)
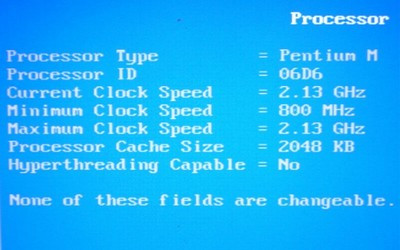
Step 6 : First boot
After completely reassembling your notebook, press the power button and pray for the thing to work, if it doesn't, curse yourself for tightening all those screws you now have to unscrew again -- next time reassemble the notebook "loosely" for preliminary checkups. Should the notebook actually boot up enter the BIOS and look for the processor info, if you did things right it should say the overclocked speed as the "Current Clock Speed". As you can see in the screenshot, our Pentium M 725 1.6 GHz processor reads as 2.13Ghz -- you're right, I don't believe it worked either.
Step 7 : Temperature check
Continue to load XP, and check if the CPU temperature is within the reasonable range. With the fresh coat of Artic Silver 5 you applied, the new CPU shouldn't be hotter then the old one. You can check and keep a constant watch over the CPU temperature using programs like speed fan, mobile meter or I8kfangui for all the Dell dudes.
If the temperatures continues to rise fast above the normal range IMMEDIATELY power the notebook off, you could fry the CPU and even damage the entire motherboard. If this wild temperature rise does happen you'll have to start all over with fresh application of Arctic Silver 5 layer and make sure the heat sink is properly mounted -- make sure the CPU fan was connected back on properly too.
Step 8 : Stability check
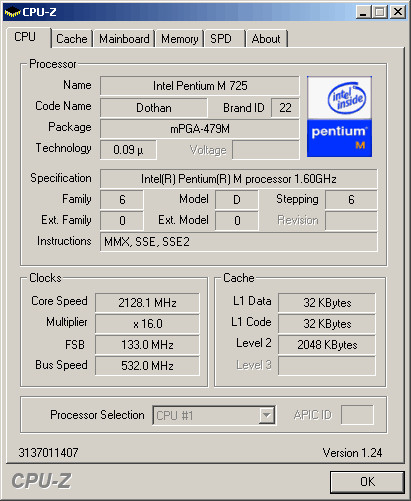
Load the program Prime 95 and start a torture test using the maximum FPU stress option that puts 100% load on the CPU. Check the CPU-Z Core Speed reading to verify that the CPU is now running at its overclocked speed. The torture test will continue until stopped or until it encounters a CPU error. Let it run for several hours to verify the CPU stability while keeping an eye on the temperature, it should increase considerably but still stay within a reasonable range.
Higher speed CPUs are more likely to fail at this stage, even if the notebook successfully booted with the overclocked CPU at a higher clock speed, the CPU will require more voltage for stable operation. While possible to achieve, the added voltage will raise the already high temperature making an overclocked 2.66Ghz notebook hot, noisy & impractical for anything but bragging. Keep a poker face as you trade your fast 1.8 GHz Dothan with someone who has a 1.6GHz Dothan -- what a sucker.
Step 9 : Benchmark ( optional )
Now that everything hopefully works OK, you probably want to tighten the remaining screws and "loose" parts and find out how much faster your notebook is now. The following comparison benchmark result were taken with the Inspiron 9300's original Intel Dothan 730 1.6Ghz 533/2MB processor that was replaced by a Dothan 725 1.6Ghz 400/2MB processor that we just overclocked to 2.13Ghz.
3DMark05 comparison before and after Processor switch and pin mod:
|
Intel Pentium M 730 1.6GHz
|
Intel Pentium M 725 1.6GHz Overclocked to 2.13GHz using pin mod
|


We get an 8% increase in the 3DMark05 score, mostly a GPU
based test
|
Intel Pentium M 730 1.6GHz
|
Intel Pentium M 725 1.6GHz Overclocked to 2.13GHz using pin mod
|


We get an 18% increase in PCMark05 results, a score that is based on processor, HD & memory.
|
Intel Pentium M 730 1.6GHz
|
Intel Pentium M 725 1.6GHz Overclocked to 2.13GHz using pin mod
|
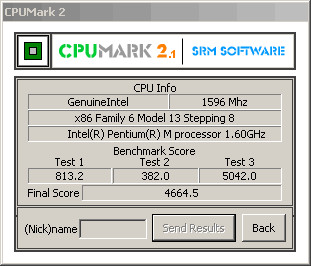
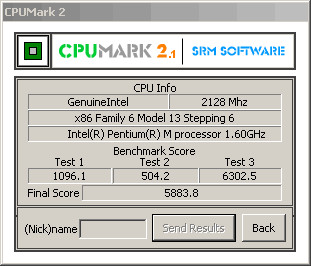
We get a 26% increase in performance with
CPUMark 2.1, a CPU focused benchmark
|
Intel Pentium M 730 1.6GHz
|
Intel Pentium M 725 1.6GHz Overclocked to 2.13GHz using pin mod
|

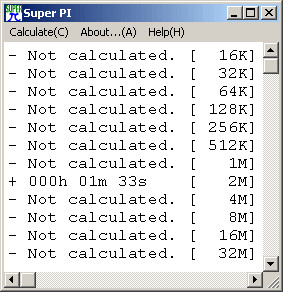
We get a 15% increase in SuperPi
results, the overclocked processor results are in line
with "authentic" 2.13Ghz Dothans scores.
Step 10 : Heat & Undervolting ( optional )
Your upgraded notebook is now scorching fast. Surprisingly, when idling or with minimum activity the overclocked Dothan @ 2.13Ghz temperatures are about the same as with the 1.6Ghz, both sitting at about 34 Celsius. This is probably because the Intel processor Speed Step technology lowers both processors to 789MHz when idling, but given the slighest CPU load the pin modded processor jumps to 2.13GHz and the temperature jumps 10 C -18 C in the blink of an eye, right up to 57 C, while the 1.6 GHz non-modded processor takes longer to warm up and peaks at 55 C.
If you are wary of drastic temperature changes you can undervolt the pin-modded overclocked processor using RM CPU clock utility. After I did a bit of undervolting on the modded Dothan running @ 2.13Ghz, it was idling at 32 C and running the demanding Prime 95 program while keeping temps stable at about 47 C.
Conclusion
Now you can brag to your friends your notebook is 33% faster, tell them Microsoft XP boots in half the time, applications startup in the blink of an eye and that you have no lag in multiplayer games. Only, you and I know such claimes would be a lie.
In reality, when using everyday applications you won't notice much difference in performance. Like most computers, your overall performance is limited by bottlenecks such as a slow hard drive, which cause the CPU to only rarely be utilized at its full speed potential -- even if you are working at 100% load. Real performance gains will be seen only with CPU intensive tasks such as audio & video encoding, rendering, mathematical applications and games where the GPU isn't the limiting factor.
Only then will you see the return on your $30-$50 investment when your 1.6Ghz Dothan overclocked to 2.13Ghz will run such processor demanding applications at the incredible speed of -- well, a 2.13Ghz Dothan retailing for hundreds of dollars. You can probably sell the old CPU you took out of the notebook for some cash, use it to buy a new door lock -- hopefully it will stop that pesky neigbour that has lately been coming over to your home to watch TV.
That's it, follow this and you've earned yourself a 2.0 GHz or 2.13 GHz Pentium-M for practically nothing, that and the right to add "1.6Ghz@2.13Ghz" to your signature in online forums being the 1ee7 h@x0r you are.
END
ALTE PROCESOARE LAPTOP:
| PROCESOR | COD | FRECVENTA | L2 CACHE | FSB | MULTIPLICATOR | VOLTAJ | CONSUM | SOCKET | DATA LANSARE | PRODUCT NUMBER | PRET LEI | BUCATI |
| Core 2 Duo T5200 | SL9VP (B2) | 1600 MHz | 2 MB | 533 MT/s | 12× | 1.0375–1.3 V | 34 W | Socket M | October 2006 | LF80537GE0252M | 180 | 1X |
| Core 2 Duo T5250 | SLA9S (M0) | 1500 MHz | 2 MB | 667 MT/s | 9× | 1.0375–1.3 V | 35 W | Socket P | Q2 2007 | LF80537GF0212M | 180 | 1x |
| Core 2 Duo T5300 | SL9WE (L2) | 1733 MHz | 2 MB | 533 MT/s | 13× | 1.0375–1.3 V | 34 W | Socket M | Q1 2007 | LF80537GE0302M | 190 | 1X |
| core 2 duo T5450 | 1667 mhz | 2 MB | 667 | 180 | 3x | |||||||
| Core 2 Duo T5500 | SL9SH (B2) SLGFK (G2) SL9U4 (L2) SLA4F (M0) |
1667 MHz | 2 MB | 667 MT/s | 10× | 1.0375–1.3 V | 34 W | Socket M | August 28, 2006 | LF80537GF0282M | 180 | 3X |
| Core 2 Duo T5600 | SL9SG (B2) SL9U3 (L2) SLA4E (M0) |
1833 MHz | 2 MB | 667 MT/s | 11× | 1.0375–1.3 V | 34 W | Socket M | August 28, 2006 | LF80537GF0342M | 200 | 2X |
| Core 2 Duo T5750 | SLA4D (M0) | 2000 MHz | 2 MB | 667 MT/s | 12× | 1.0375–1.3 V | 35 W | Socket P | January 2008 | LF80537GF0412M | 200 | n/a |
| Core 2 Duo T7100 | SLA4A (M0) SLA3U (M1) |
1800 MHz | 2 MB | 800 MT/s | 9× | 0.9–1.175 V | 35 W | Socket P FCBGA6 | May 9, 2007 | LF80537GG0332M LE80537GG0332M | 200 | 1X |
| Core 2 Duo T7200 | SL9SF (B2)SL9SL (B2) | 2000 MHz | 4 MB | 667 MT/s | 12× | 1.0375–1.3 V | 34 W | Socket MFCBGA6 | August 28, 2006 | LF80537GF0414MLE80537GF0414M | 300 | n/a |
| Core 2 Duo T7250 | SLA49 (M0) SLA3T (M1) | 2000 MHz | 2 MB | 800 MT/s | 10× | 1.075–1.175 V | 35 W | Socket P FCBGA6 | September 2, 2007 | LF80537GG0412M LE80537GG0412M | 250 | 1X |
| Core 2 Duo T7300 | SLA45 (E1) SLA3P (E1) | 2000 MHz | 4 MB | 800 MT/s | 10× | 1.0375–1.3 V | 35 W | Socket P FCBGA6 | May 9, 2007 | LF80537GG0414M LE80537GG0414M | 300 | 1X |
| Core 2 Duo T7700 | SLA43(E1) | 2400 MHz | 4 MB | 800 MT/s | 12× | 1.0375–1.3 V | 35 W | Socket P | 9-May-07 | LE80537GG0564M | 400 | 1X |
| Core 2 Duo T6400 | SLGJ4 (R0) | 2000 MHz | 2 MB | 800 MT/s | 10× | 1.00–1.250 V | 35 W | Socket P | January 6, 2009 | AW80577GG0412MA | 300 | 1X |
| Core 2 Duo T6500 | SLGF4 (R0) | 2100 MHz | 2 MB | 800 MT/s | 10.5× | 1.00–1.250 V | 35 W | Socket P | January 6, 2009 | AW80577GG0452ML AW80577GG0452MA | 300 | 1X |
| Core 2 Duo T8100 | SLAP9 (M0)SLAVJ (M0)SLAYP (M0)SLAYZ (C0) | 2100 MHz | 3 MB | 800 MT/s | 10.5× | 1.000–1.250 V | 35 W | Socket P | FF80577GG0453M (M0)FF80576GG0453M (C0)BX80577T8100 | 300 | 1X | |
| Core 2 Duo P7450 | SLB45 (M0)SLGF7 (R0)SLB54 (C0) | 2133 MHz | 3 MB | 1066 MT/s | 8× | 1.00–1.250 V | 25 W | Socket P | January 2009 | AW80577SH0463M | 350 | 1X |
| Core 2 Duo P8400 | SLB3R (M0) | 2267 MHz | 3 MB | 1066 MT/s | 8.5× | 1.00–1.250 V | 25 W | Socket P | June 13, 2008[18] | AW80577SH0513M | 350 | 2X |
| PROCESOR | COD | FRECVENTA | L2 CACHE | FSB | MULTIPLICATOR | VOLTAJ | CONSUM | SOCKET | DATA LANSARE | PRODUCT NUMBER | PRET LEI | |
| Turion 64 TK-36 | 2000 MHz | Socket S1 | 150 | 1X | ||||||||
| Turion 64 X2 TL-58 | 1900 MHz | 2 x 512 KB | 800 MHz | 9.5x | 1.075/1.1/1.125 | 31 W | Socket S1 | May 7, 2007 | TMDTL58HAX5DC | 160 | 2X | |
| Turion 64 X2 TL-60 | 2000 MHz | 2 x 512 KB | 800 MHz | 10x | 0.8/1.075/1.1/1.125 | 31 W | Socket S1 | May 7, 2007 | TMDTL60HAX5DC | 200 | 1X | |
| Turion 64 X2 TL-64 | 2200 MHz | 2 x 512 KB | 800 MHz | 11x | 1.075/1.1/1.125 | 35 W | Socket S1 | May 7, 2007 | TMDTL64HAX5DC | 250 | 1X | |
| Turion X2 RM-70[2] | 2000 MHz | 2 x 512 KB | 1800 MHz | 10x | 0.8-1.125 | 31 W | Socket S1G2 | June 4, 2008 | TMRM70DAM22GG | 300 | 4X | |
| Turion X2 RM-72[2] | 2100 MHz | 2 x 512 KB | 1800 MHz | 10.5x | 0.8-1.125 | 35 W | Socket S1G2 | Q3 2008 | TMRM72DAM22GG | 320 | 1X | |
| Turion X2 RM-74[2] | 2200 MHz | 2 x 512 KB | 1800 MHz | 11x | 0.8-1.125 | 35 W | Socket S1G2 | Q4 2008 | TMRM74DAM22GG | 350 | 1X | |
| Turion X2 Ultra ZM-82[2] | 2200 MHz | 2 x 1 MB | 1800 MHz | 11x | 0.75-1.2 | 35 W | Socket S1G2 | June 4, 2008 | TMZM82DAM23GG | 350 | 3X | |
| Athlon II M300 | 2000 MHz | 2x 512 KB | 64-bit | 1600 MHz | 10x | 35 W | Socket S1G3 | September 10, 2009 | AMM300DBO22GQ | 350 | 1x | |
| Athlon X2 QL-64 | 2100 MHz | 2 x 512 KB | 1800 MHz | 10.5x | 0.95-1.1 | 35 W | Socket S1G2 | Q4 2008 | AMQL64DAM22GG | 350 | 1x | |
| intel Core Duo t2000 1,73 1m 533 | 100 | 1X | ||||||||||
| 3x intel core duo t2400 1,83 2m 667 | 100 | 3X | ||||||||||
| intel core duo t2050 1.6 2m 533 | 100 | N/A | ||||||||||
| 2x intel t2350 1,86 2m 533 | 100 | 2X | ||||||||||
| 2 x Intel Core Duo T2130 1,86 ghz 533 1 mb l2 cache sl9vz | 100 | N/A | ||||||||||
| Intel Core Duo T2250 sl9dv 1,73ghz 533 2mb cache | 100 | 3X | ||||||||||
| Intel Core Duo T2300E 1.66ghz 667 2mb l2 cache sl8vr | 100 | 1X | ||||||||||
| Intel Centrino Pentium M 1,4 ghz 400 1 mb l2 cache SL6F8 40 ron | ||||||||||||
| Intel Centrino Pentium M 1,5 ghz 400 1mb l2 cache 50 ron | ||||||||||||
| Intel Centrino Pentium M740 1,73 ghz 533 2mb l2 cache 80 ron | ||||||||||||
| Intel Centrino Pentium M750 1,86 ghz 533 2mb l2 cache 100 ron -1 | ||||||||||||
| Intel Centrino Pentium M760 2 Ghz 533 2 mb l2 cache 160 ron | ||||||||||||
| Intel Celeron M340 1,5 ghz 400 512 l2 cache 40 ron | ||||||||||||
| Intel Celeron M360 1,4 ghz 400 1mb l2 cache 50 ron | ||||||||||||
| Intel Celeron M380 1.6 ghz 400 1mb l2 cache 50 ron | ||||||||||||
| Intel Pentium 4M Mobile 1,8 ghz 400 512 l2 cache 40 ron | ||||||||||||
| Intel Pentium 3 M 1 Ghz SL53s 100 256 l2 cache 80 ron | ||||||||||||
Modalitati de livrare si plata
LIVRARE
In Bucuresti
-
- Predare personala in max. 24 de ore
PLATA
- - La predare
- - Ramburs
Politica de retur
- - Produsul nu se poate returna.
Nu ai gasit ce cautai?
Instaleaza aplicatia Okazii.ro